


You’re holding a vial of lyophilized peptide. It’s a delicate, chalky substance that represents a significant investment in your research. The potential is immense, but only if you handle it correctly from the very first step. That first step—reconstitution—is where countless research variables are either controlled or catastrophically introduced. Let's be honest, this is crucial. Knowing how to reconstitute tesamorelin 10mg isn't just about adding water to a powder; it's a meticulous process that preserves the molecule's intricate structure and biological activity. Get it wrong, and your data could be compromised before your study even begins.
Our team at Real Peptides has seen it all. We've spoken with researchers who've inadvertently destroyed valuable compounds through simple, avoidable mistakes. That’s why we’re putting our collective experience down on paper. This isn't just a set of instructions; this is our professional protocol, refined over years of working with these sensitive molecules. We believe that supplying high-purity peptides is only half the battle. The other half is empowering you with the knowledge to use them correctly. Your research deserves impeccable precision, and that's exactly what we're going to walk through together.
Before You Begin: The Non-Negotiable Checklist
Before you even think about uncapping a vial, you need to prepare your workspace. This isn't the time for shortcuts. We can't stress this enough: a sterile environment is paramount to preventing contamination and ensuring the viability of your peptide. Think of it as setting the stage for success. A few minutes of prep work can save you from hours of questionable results down the line.
Here’s what you absolutely must have on hand:
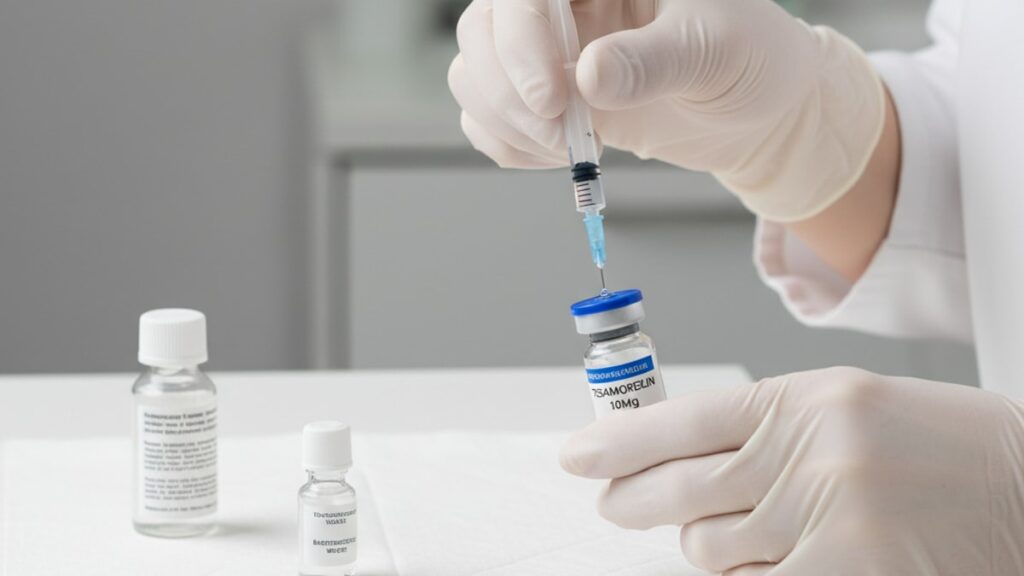
- Your Vial of Tesamorelin: First, inspect it. Our Tesamorelin Peptide comes as a solid, lyophilized (freeze-dried) cake at the bottom of the vial. It should look uniform. If you see any discoloration or if the powder seems loose and not compacted, that's a red flag. At Real Peptides, our small-batch synthesis ensures consistency, but you should always perform a visual check.
- Diluent: The liquid you'll use for reconstitution. The most common and highly recommended choice is Bacteriostatic Water. We’ll dive much deeper into why in the next section.
- Syringes: You’ll need at least two. One larger syringe (typically 3mL or 5mL) for drawing and measuring the diluent, and a smaller insulin syringe (usually 1mL/100 units) for measuring your final research dose.
- Alcohol Prep Pads: For sterilizing everything. The rubber stopper on the peptide vial, the stopper on your diluent vial—everything the needle will touch needs to be thoroughly wiped down.
- A Clean, Stable Surface: Work in a draft-free area, away from open windows or high-traffic zones. A dedicated lab bench is ideal, but a disinfected countertop can work in a pinch. The goal is to minimize airborne contaminants.
Once you have your supplies gathered, lay them out on your clean surface. Wash your hands thoroughly. This entire process is about methodical, deliberate action. Rushing is your enemy.
Understanding Your Key Components: Tesamorelin and Diluents
To reconstitute something properly, you have to understand what you're working with. Tesamorelin is a synthetic analogue of growth hormone-releasing hormone (GHRH). It's a delicate chain of 44 amino acids. Think of it like a fragile, precisely folded piece of origami. The wrong solvent or rough handling can unfold or break it, rendering it useless. That's why your choice of diluent is so incredibly important.
It’s not just water. The type of water you use dictates the stability, sterility, and shelf-life of your reconstituted peptide. Our experience shows that this choice is one of the most common points of failure for new researchers. Let's break down the options.
| Diluent Option | Description | Key Advantage | Major Disadvantage | Our Recommendation |
|---|---|---|---|---|
| Bacteriostatic Water | Sterile water containing 0.9% benzyl alcohol. | The benzyl alcohol acts as a preservative, inhibiting bacterial growth. | The alcohol can degrade a small subset of highly sensitive peptides. | The Gold Standard. For Tesamorelin and most research peptides, this is the best choice for multi-use vials. |
| Sterile Water | Purified water that has been sterilized and contains no preservatives. | No preservatives means no potential interaction with the peptide. | Highly susceptible to bacterial contamination after the first use. | Only suitable if you plan to use the entire vial in a single session (within 24 hours). |
| Acetic Acid (0.6%) | An acidic solution sometimes used for peptides that are difficult to dissolve. | Can help solubilize certain stubborn peptides (hydrophobic ones). | The acidic pH can damage many peptides, including Tesamorelin. | Not Recommended for Tesamorelin. The pH is incompatible and will likely degrade the molecule. |
For Tesamorelin, the choice is clear. You need Bacteriostatic Water. The benzyl alcohol preservative is critical for maintaining a sterile solution if you're drawing multiple doses from the same vial over several weeks. Using sterile water without a preservative is an invitation for contamination, which can completely invalidate your research findings.
The Core Protocol: How to Reconstitute Tesamorelin 10mg Step-by-Step
Alright, your workspace is clean and your supplies are ready. Now we get to the heart of the matter. We're going to walk through this with the precision it deserves. Follow these steps exactly, and you'll have a perfectly reconstituted solution ready for your research.
Step 1: Preparation and Sterilization
Take an alcohol pad and vigorously wipe the rubber stopper on your vial of Tesamorelin. Do the same for the vial of bacteriostatic water. Let them air dry for a moment. Don't blow on them. This simple act removes surface contaminants and is a non-negotiable part of maintaining sterility.
Step 2: Calculating Your Diluent Volume
This is where math comes in, but don't worry, it's straightforward. Your goal is to create a solution with a known concentration. For a 10mg vial of Tesamorelin, a common and easy-to-work-with concentration is 2mg per 1mL.
Here's the formula our team uses:
(Total Peptide in Vial (mg)) / (Desired Concentration (mg/mL)) = Total Diluent to Add (mL)
Let’s apply it:
(10mg Tesamorelin) / (2mg/mL) = 5mL of Bacteriostatic Water
By adding 5mL of bacteriostatic water to your 10mg vial, every 1mL of solution you draw out will contain exactly 2mg of Tesamorelin. Simple, right?
You could choose other concentrations. For example, adding 2mL of water would give you a concentration of 5mg/mL (10mg / 2mL). This is a more concentrated solution, meaning you'd use a smaller volume for each dose. For most research protocols, our team finds that a 2mg/mL or even 1mg/mL (by adding 10mL of water) concentration provides the best balance of accuracy and ease of measurement.
Step 3: Drawing the Diluent
Take your larger 3mL or 5mL syringe. Let's assume you're adding 5mL of water. You'll need to draw it in two parts if you're using a 3mL syringe.
Uncap the needle. Pull the plunger back to the 2.5mL or 3mL mark, filling the syringe with air. Insert the needle through the rubber stopper of the bacteriostatic water vial. Inject the air into the vial. This equalizes the pressure and makes it much easier to draw the liquid out. If you skip this, you'll be fighting a vacuum.
Now, invert the vial and draw your required amount of water into the syringe. Remove the needle.
Step 4: Injecting the Diluent into the Tesamorelin Vial
This is the most delicate part of the entire process. Remember that fragile origami? You don't want to blast it with a jet of water.
Take the syringe filled with bacteriostatic water and carefully insert the needle through the center of the Tesamorelin vial's rubber stopper. Here's the key technique: angle the needle so the water runs down the inside wall of the glass vial. Do not inject the water directly onto the lyophilized powder cake. This forceful stream can shear the peptide chains.
Slowly and gently depress the plunger, letting the water trickle down the side and pool around the powder. Once all the water is in, gently remove the syringe.
Step 5: Mixing the Solution
Your first instinct might be to shake the vial to dissolve the powder. Do not do this. We mean it. Shaking is catastrophic for peptide integrity. The agitation and creation of bubbles can denature the protein structure.
Instead, you're going to gently mix it. You have two options:
- Swirling: Hold the vial between your thumb and forefinger and gently swirl it in a circular motion. Watch as the powder dissolves into the water.
- Rolling: Place the vial between the palms of your hands and gently roll it back and forth.
This process might take a minute or two. Be patient. The lyophilized cake will dissolve completely, leaving you with a perfectly clear solution. That clarity is your sign of success.
Step 6: Verification
Hold the vial up to a light source. The final solution should be completely clear. There should be no floaters, cloudiness, or sediment. If your solution is cloudy, it could indicate a problem with contamination or that the peptide has not fully dissolved or has degraded. In such a rare case, it's best not to use it for your research, as the results would be unreliable.
Critical Dosing Calculations: From Vial to Syringe
Congratulations, you've successfully reconstituted your peptide. But now comes the next critical step: accurately drawing a precise dose for your research application. This requires understanding the relationship between the concentration you created and the markings on your insulin syringe.
Most research protocols use an insulin syringe, which is marked in Units. A standard 1mL syringe has 100 units. Therefore:
- 100 Units = 1 mL
- 50 Units = 0.5 mL
- 10 Units = 0.1 mL
Let’s stick with our example where we created a solution of 2mg of Tesamorelin per 1mL of water.
Now, suppose your research protocol calls for a dose of 1mg. How much solution do you need to draw?
Here’s the calculation:
(Desired Dose (mg)) / (Concentration (mg/mL)) = Volume to Draw (mL)
(1mg) / (2mg/mL) = 0.5mL
So, you need to draw 0.5mL of the solution. On your 1mL insulin syringe, 0.5mL is equal to the 50 Unit mark. Easy.
What if your protocol calls for a smaller dose, say 500mcg? First, remember that 1000mcg = 1mg. So, 500mcg is 0.5mg.
Let's run the calculation again:
(0.5mg) / (2mg/mL) = 0.25mL
On your insulin syringe, 0.25mL is the 25 Unit mark. This is why creating a sensible concentration is so important—it makes the math for your daily protocol simple and reduces the chance of error. Our team always recommends double-checking your math before drawing each dose. Precision is repeatable.
Storage and Stability: Protecting Your Reconstituted Peptide
Once reconstituted, your Tesamorelin is no longer in a state of suspended animation. It's now in a liquid solution where degradation can begin to occur. Proper storage is absolutely essential to maximize its lifespan and potency.
Refrigeration is mandatory.
Store your vial of reconstituted Tesamorelin in the refrigerator, typically between 2°C and 8°C (36°F and 46°F). Do not freeze it. Freezing and thawing can damage the peptide structure just as much as shaking can.
Keep the vial in its original box or a dark container to protect it from light, as prolonged light exposure can also contribute to degradation. When stored correctly in a refrigerator, Tesamorelin reconstituted with bacteriostatic water is generally stable for several weeks, often up to 4-6 weeks. If you had used sterile water, the clock is ticking much faster—you'd need to use it within 24 hours due to the risk of bacterial growth.
This extended stability is another reason we champion Bacteriostatic Water as the superior diluent. It provides the flexibility and safety margin that rigorous, long-term research demands.
Common Pitfalls and How to Sidestep Them
Over the years, our team has heard about every possible mistake. Learning from them can help ensure your own process is flawless.
-
The Mistake: Shaking the vial vigorously.
- The Outcome: Denatured peptides, wasted product, and invalid data.
- The Fix: Always remember to gently swirl or roll. Patience is a virtue in peptide handling.
-
The Mistake: Using the wrong diluent (like sterile water for a multi-use vial).
- The Outcome: Bacterial contamination after the first use, creating a non-sterile solution that is dangerous and useless for research.
- The Fix: Stick to the gold standard: bacteriostatic water for any vial you won't be using in a single day.
-
The Mistake: Injecting the diluent directly onto the powder.
- The Outcome: Potential mechanical damage to the peptide chains, reducing the overall potency of the solution.
- The Fix: Master the technique of letting the water run down the side of the vial. It's a small detail with a huge impact.
-
The Mistake: Dosing calculation errors.
- The Outcome: Inconsistent application and unreliable results. Giving too much or too little of the compound invalidates the entire experiment.
- The Fix: Write down your formula. Double-check your math every single time. Use an online peptide calculator if you're unsure. A moment of verification saves weeks of wasted effort.
Why Purity is Paramount in Peptide Research
Ultimately, the success of your research doesn't just hinge on your reconstitution technique. It starts with the quality of the peptide itself. You can have the most impeccable sterile technique in the world, but if you start with a product that's impure or incorrectly synthesized, your results will be flawed from the outset.
This is the core philosophy at Real Peptides. We focus on small-batch synthesis because it allows for a level of quality control that mass production simply can't match. Every vial of our Tesamorelin Peptide has a precise amino acid sequence, guaranteed. This commitment to purity means you're starting with a known, reliable variable. It's the foundation upon which good science is built.
This principle applies across the board, whether you're working with GHRH analogues like Sermorelin, GHRPs like Ipamorelin, or even advanced research stacks like our Tesamorelin Ipamorelin Growth Hormone Stack. The integrity of the source material is the one thing you can't afford to compromise on. When you know your compound is pure, you can focus all your attention on perfecting your methods, like reconstitution, knowing your baseline is solid.
Following a meticulous protocol is how you honor the investment you've made in your research. It ensures that the high-quality peptide you purchased is able to perform as expected, giving you the clean, reliable data you need to move your work forward. It's about respecting the science, from the vial to the final result. If you're ready to see the difference that quality makes, we invite you to explore our full range of peptides and Get Started Today.
Executing these steps with care and precision will become second nature over time. It’s this attention to detail that separates good research from great research. By controlling these fundamental variables, you set your projects up for clarity, accuracy, and ultimately, success.
Frequently Asked Questions
What is the best liquid to reconstitute tesamorelin with?
▼
Our team strongly recommends using bacteriostatic water. It contains 0.9% benzyl alcohol, which acts as a preservative to prevent bacterial growth, making it ideal for multi-dose vials. This ensures the solution remains sterile throughout its use.
Can I use sterile water instead of bacteriostatic water?
▼
You can, but only if you plan to use the entire reconstituted vial within 24 hours. Sterile water contains no preservative, so once the seal is punctured, it’s susceptible to contamination. For multi-dose use, bacteriostatic water is the much safer option.
Why shouldn’t I shake the vial after adding water?
▼
Shaking creates agitation and foam, which can damage the delicate amino acid chains of the tesamorelin peptide. This process, called denaturation, can render the peptide ineffective. Always mix by gently swirling or rolling the vial.
How long does reconstituted tesamorelin last?
▼
When reconstituted with bacteriostatic water and stored properly in a refrigerator (between 2°C and 8°C), tesamorelin is typically stable for 4 to 6 weeks. Always protect it from light to maximize its lifespan.
What should I do if my reconstituted tesamorelin solution is cloudy?
▼
A properly reconstituted solution should be perfectly clear. If it appears cloudy or has particles, it may indicate contamination, incomplete dissolving, or degradation of the peptide. We advise against using any solution that is not completely clear.
How do I calculate the right amount of water for a 10mg vial?
▼
Use the formula: (10mg) / (Your Desired Concentration in mg/mL) = mL of water to add. For example, to get a 2mg/mL solution, you would add 5mL of bacteriostatic water (10mg / 2mg/mL = 5mL).
Should I freeze my reconstituted tesamorelin to make it last longer?
▼
No, you should never freeze reconstituted peptides like tesamorelin. The process of freezing and thawing can damage the molecular structure, similar to shaking. The best storage method is refrigeration.
What’s the difference between mg and mcg for dosing?
▼
These are units of mass, where 1 milligram (mg) is equal to 1000 micrograms (mcg). It’s critical to pay close attention to your research protocol’s units to avoid dosing errors. Always double-check your conversions.
Why does the water have to run down the side of the vial?
▼
Injecting the diluent directly onto the lyophilized powder can physically break the peptide chains due to the force of the stream. Letting the water gently run down the inside wall of the vial is a much gentler method that protects the molecule’s integrity.
Is it normal for a vacuum to be in the tesamorelin vial?
▼
Yes, lyophilized peptides are often vacuum-sealed to ensure stability and sterility during shipping and storage. You may hear a slight hiss as the needle punctures the stopper, which is completely normal.
What type of syringe is best for dosing?
▼
For accurate dosing, we recommend a 1mL insulin syringe marked in 100 units. These syringes allow for precise measurement of small volumes, which is essential for consistent and reliable research applications.